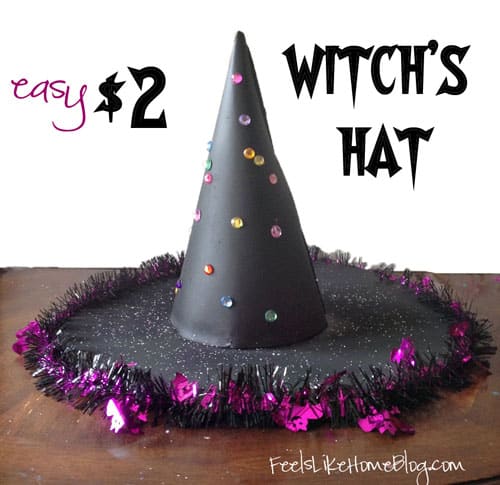
How to Make an Easy $2 Witch\’s Hat
@media (max-width: 1200px) {
}.ns-inline:not(.ns-columns) .ns-buttons-wrapper {
justify-content: center;
}body .ns-inline:not(.ns-columns) a.ns-button, body .ns-inline .ns-total-share-count {
margin: 0px 5px 10px 5px;
}7FacebookMessenger335PinterestTwitterWhatsAppEmail342SHARESbody .ns-pinterest-image{display:block;position:relative;margin:0;padding:0;line-height:0}figure>.ns-pinterest-image{height:100%;width:100%}body .wp-block-image .ns-pinterest-image+figcaption{display:block}body .ns-pinterest-image-button{opacity:0;transition:.3s;position:absolute;height:18px;max-height:18px;width:auto!important;padding:10px;cursor:pointer;background:#c92228;color:#fff;font-size:16px;line-height:18px;z-index:1;text-decoration:none;box-sizing:content-box;top:10px;left:10px}body .ns-pinterest-image-button:hover{background:#b51f24}body .ns-pinterest-image-button:visited{color:#fff}body .ns-pinterest-image:hover .ns-pinterest-image-button{opacity:1}body .ns-pinterest-image-button svg{width:18px;height:18px;vertical-align:middle;pointer-events:none}
This is a sponsored post.
Pin
My girls like to wear birthday hats. Allie especially likes them because she thinks she\’ll get a birthday cake and presents every time she puts one on.
It never pans out, but she always has hope.
I buy party hats at the dollar store. They have tons of them to choose from in several different sizes, and they are very cheap. The last time we were there, they had big, fancy ones – covered in stars, with tinsel at the top and all around the bottom.
I mentioned to Grace that the black ones looked like witch\’s hats, and she agreed. She and Allie each picked out black ones to come home and transform. Â I\’ll show you those another day.
Today, I\’m going to show you how I took a $1 party hat and a $1 Halloween garland, added a few things from my craft stash, and made a really great witch\’s hat. I\’ll also tell you the big blunders I made so that you can avoid it.
Check out the video after the craft project for info on the Hub Network\’s First Annual Halloween Bash Costume Contest. One winner from each state will be flown to Los Angeles to appear in The Hub\’s First Annual Halloween Bash and have the chance to win $25,000!
It\’ll be great.
Witch\’s Hat Materials
- A party hat
- A marker
- Material for a brim -Â if you got regular-sized party hats, you could use paper plates for brims. We\’ve done that before, and it works well. I was tempted by an extra large party hat, so I had to get creative with my brim. I used a piece of foam board that has been behind my couch for two years. Poster board would have been a lot easier to work with.
- Spray paint – I tried paint-on paint, and it was a miserable failure. As the paint dried, it peeled off the shiny hat. It also didn\’t cover very well and left big streaks. It looked horrible. Skip the regular paint and go for spray paint. My spray paint cost 89 cents. Splurge on it for this project if you don\’t have some already.
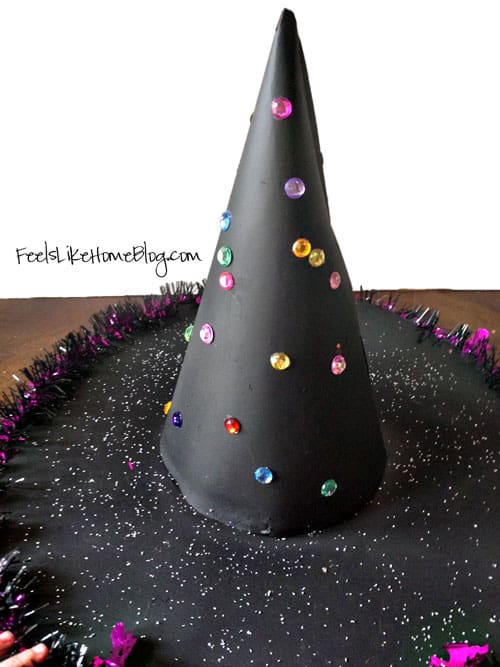
- Decorations – You can use whatever decorations you have. I bought a garland at the dollar store and also pulled jewels, glitter, googly eyes, glitter glue, sequins, and feathers from our craft supplies. I decided to make my witch\’s hat sophisticated and used only jewels and glitter, but I let the kids do theirs however they wanted to.
- Glue dots – Glue dots made this project a lot easier than it otherwise would have been. Hot glue would have worked pretty well, too, but it\’s hard for me to use with a 2-year-old running around. The key is that you need something fast, and tape isn\’t strong enough.
Getting Started
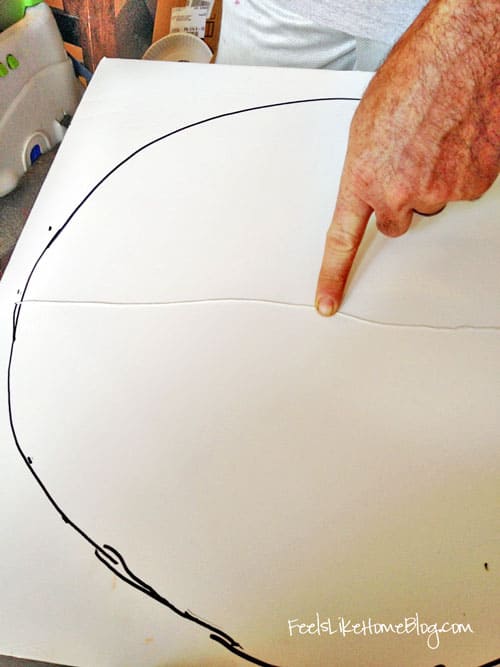
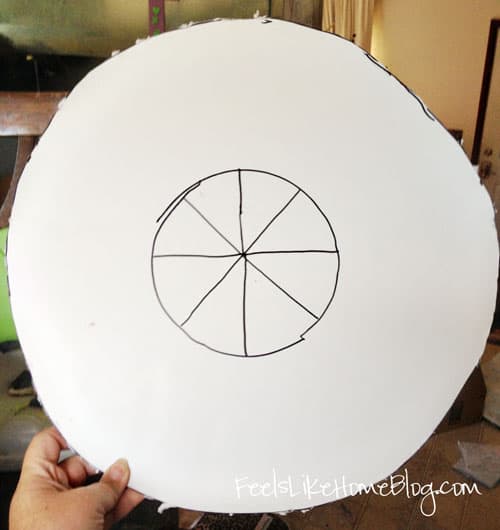
1. If you\’re using a normal-sized party hat with a paper plate brim, you can skip this step. (Note to self, next time, do that. It\’s a lot easier.) Â Decide how big your brim needs to be. If you have a large compass, that\’s great. Use it. If you don\’t, you\’re going to have to cut a string the width of half of the brim, anchor it in the middle of the circle (I made my husband hold mine), and draw where it lands the whole way around the center. Instead of trying to draw a solid line, I marked where my string fell every couple of inches and then connected those dots with a curving line.
Does that make any sense at all? You have to make your own compass, using that string as the radius of the circle. It doesn\’t have to be perfect; you just want to get a pretty even curve. Witch\’s hats do not have egg-shaped brims.
While you\’re at it, mark the center of your circle with a pin hole or a marker. You\’ll need to know that later.
 Pin
Pin
2. Cut out the brim. It doesn\’t matter if the edges look horrible; you\’ll cover them later on.
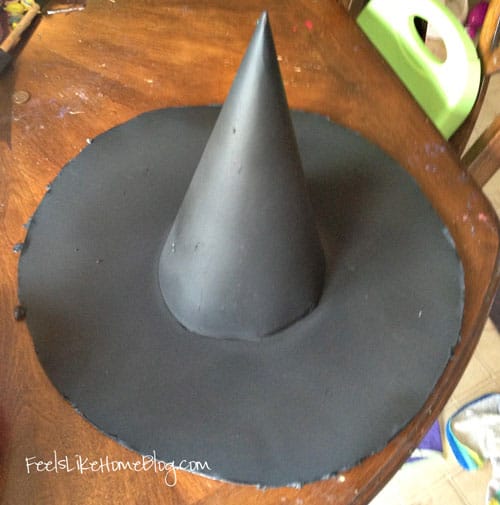
3. Place the hat over the center of the brim and trace it. I made a big mistake here and traced inside the hat (thinking that I didn\’t want the traced line to show when the hat was placed on the brim). The result is that my finished hat has a hole too small for even Allie\’s head. No one can wear the hat. It has been relegated to a Halloween decoration in the dining room.
If you want to wear your hat, make sure the hole is big enough to accommodate your head.
Divide your circle into eighths by drawing a line down through the center of the circle, then across the center, then by cutting each newly drawn section in half. The sections don\’t have to be precise; no one will ever see them.
 Pin
Pin
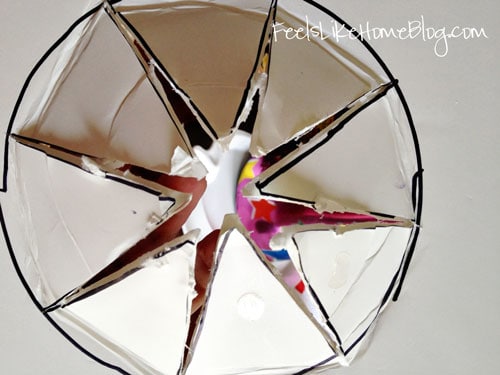
3. Cut on the spokes and bend them upwards. Put glue dots on the top of each triangle and press each one onto the inside of the hat. Or, if you\’d rather use hot glue, hot glue the triangles to the hat. I can\’t think of any other adhesive that will hold this together, so if there is one, let me know in the comments.
 Pin
Pin
This is what the hat will look like on the inside.
 Pin
Pin
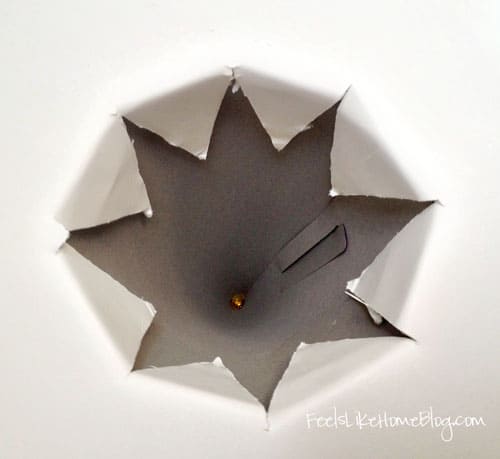
See how my adhesive pulls the hat in towards the center? It\’s because I made my circle too small. Make yours bigger than you think it needs to be.
 Pin
Pin
4. Spray paint the hat. I don\’t have any photos of this part because I made Joe do it because Joe offered to do it for me. I\’m a putz with a can of spray paint. I think it took 3 coats, but that was partly because he was trying to cover the mess I\’d made earlier with the tempera paint.
 Pin
Pin
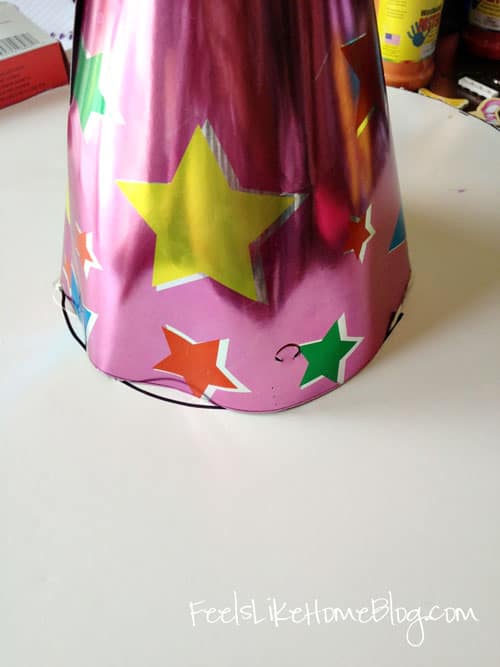
5. Decorate the hat. I used glue dots to stick the garland on the raw edge of the brim and also to stick on the jewels. I used Mod Podge to stick on the glitter. My girls (whose hats are not pictured of course) used glops of tempera paint and glue dots to stick things to their hats.
 Pin
Pin
Have you ever created your own Halloween costume?
I have made a few over the years, including one very awesome puppy dog costume.
If you think you have an a costume this year, you need to enter Hub Network\’s First Annual Halloween Bash Costume Contest! One winner from each state will be flown to Los Angeles to appear in The Hub\’s First Annual Halloween Bash and have the chance to win $25,000!
$25,000!
Here\’s more info about the contest –
Store-bought, pre-made costumes are not allowed in the contest. All costumes entered must be completely unique and one-of a kind.
What are you waiting for?! Submissions will only be accepted until September 29!
Get full contest details at hubworld.com/halloween.
Disclosure: This post was sponsored by Hub Network through their partnership with Circle of Moms. While I was compensated to write a post about Hub Network\’s First Annual Halloween Bash Costume Contest, all opinions are my own.
@media (max-width: 1200px) {
}.ns-inline:not(.ns-columns) .ns-buttons-wrapper {
justify-content: center;
}body .ns-inline:not(.ns-columns) a.ns-button, body .ns-inline .ns-total-share-count {
margin: 0px 5px 10px 5px;
}7FacebookMessenger335PinterestTwitterWhatsAppEmail342SHARES