Pamela’s Garden Design – 2022 UPDATE
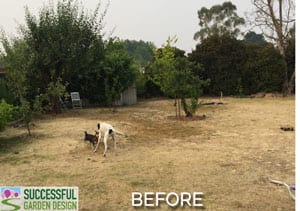
This week we take a look at Successful Garden Design student, Pamela’s garden. She lives with her husband, two young children and 2 dogs in the regional city of Orange, NSW, Australia. This is the garden that they started out with. I will now pass you over to Pamela to tell you more about their …


This week we take a look at Successful Garden Design student, Pamela’s garden.
She lives with her husband, two young children and 2 dogs in the regional city of Orange, NSW, Australia.
This is the garden that they started out with.
I will now pass you over to Pamela to tell you more about their garden…
We have lived in Orange for 11 years and despite our best efforts with the garden and lots of money spent trying to improve it, things were still a long way off perfect.
I was inspired to do Rachel’s course after watching an intro video that popped up on my facebook feed one day. We had already realised we needed some professional assistance with the design and were loath to pay a huge amount to a landscape architect.
The main problems with our garden were:
- the large size that was covered in a poor quality mix of grass
- already established trees dotted around the garden
- no focal points or nice views from the windows
- we already had some pathways, deck etc in place
The nearly finished garden

Using the ‘shape first method’ that Rachel encourages really removed the overwhelming fear I had about where to start when designing the garden.
We still needed a decent sized lawn for the kids and dogs to play on but by using 2 circles in a figure 8 shape with a path around it, suddenly everything became connected.

By creating large beds, we could incorporate the already existing fruit trees into the border, we moved a couple to new locations and re-seeded the lawn where we had gaps.
By moving some of the already established plants from other spots in the garden into the beds our finished design looks far more advanced than had we used brand new plants everywhere, the planting is only 4 months old.

Digging out all the grass took the most time (everyday for several months), we laid the steel edging and made the path ourselves from crushed granite and then used a whaka paka to compact it.
We added new top soil to the beds, got the plants in at the start of Oct (spring in Orange) and then mulched everything with wood chip. I prefer this chunky version as the birds don’t disturb it as much as the finer stuff so it stays in place better.

We found doing all the heavy labour ourselves made the garden re-design amazingly cost effective not to mention satisfying.
My top tip for other people embarking on the course is to consider a good mulch for the areas that are not lawn or path – the mulch covers a multitude of sins (great for under trampolines, around sheds etc and ties everything in the garden together. As well as helping the soil retain moisture, it also makes the green lawn and plants really pop with the colour contrast.

Reducing the lawn area has been great as we now only have a smaller patch to aerate, feed, mow etc and can put more effort into getting it looking really good.

I am so thrilled I did Rachel’s course and I’m looking forward to starting another garden re-design project in the autumn at another house.
Congratulations to Pamela and her husband for a great job, all their hard work has certainly paid off :o)
**UPDATE – a year later…
Pamela has kindly kept in touch and sent in these…


The whole garden has grown really well in the last year making it look a lot more established.

View this post on Instagram
Learn garden design yourself…
If you’d like to do the same course Pamela took then take a look at the Fast-Track Garden Design Formula…

And if you’d like to view the FREE web class, you can sign up here: https://www.successfulgardendesign.com/free-classes/


