Sloping garden ideas – successful landscaping design tips
Sloping gardens can be terraced or left with the natural slope, the design shapes you choose are critical to get right because
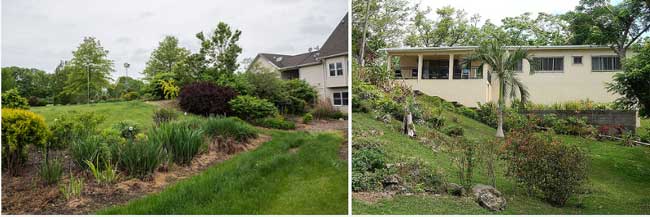
How do you tackle sloping gardens like these?

With severe garden slopes, you basically have 3 options:
- Live with the slope
- Terrace it (quickly or slowly)
- The compromise
Whilst the garden design methods I teach here at Successful Garden Design are simple and cost-effective, that does change the moment you have to tackle a sloping garden…
If you’re going to terrace a severe slope or any slope for that matter, you are going to have to spend money on it.

Earthmoving and wall building are two of the most expensive aspects of landscaping. So let’s look at how you can mitigate some of the expense if you’re on a tight budget, and how to do it really well if you’re not!
1. A garden slope you can live with

The effectiveness of this will, of course, depend on the severity of the slope but if you simply don’t have the funds to throw at sorting out levels your best option is to make the most of it.
The most forgiving shapes to use are free-flowing curves in your design layout. They still need to be coherent and work with the shape the garden you have, to be successful (view our free garden design web class for more on design shapes).

Free-flowing curved shaped borders will cope much better with slopes and undulations than any other design shapes – avoid straight lines at all costs, especially if your garden slopes from side to side as well as up and down.
If the slope is very severe a path at the side of the garden that has steps is also a good option to consider so you don’t have to slide down the length of your garden in wet weather!
2. Terracing a sloping garden

Your choice here is quickly or slowly…
Quickly is when there’s a sudden drop and you need a significant flight of steps to get from one level to the other(s).


Slowly is when you have several levels that gradually get you from the top to bottom of the garden with only 3 or 4 steps per level.

That decision needs to be made depending on the existing levels. Whilst you can completely change the levels with machinery, it will cost less if you base your level changes on what’s there now.
The other factor to consider is safety. If you’ve got young children or older relatives who are a little wobbly on their legs the slower level changes are preferable.

That’s not to say you can’t move and adjust the position of the level change – you can and should take aesthetics into account, just try not to go overboard with your soil moving and think about how your changes are likely to impact your neighbours.
The neighbours probably won’t want you to build a terrace that means you overlook their garden all the time, nor will they appreciate their garden suddenly disappearing under your fence in the first heavy downpour because you’ve changed the levels and not put in enough retaining walls!
3. The sloping garden compromise
Like all good compromises, this is somewhere in the middle of two listed above.
The things you will notice the most are your patio and lawn areas. So come up with a design layout that links them together and then make them as flat as you can (without having to sell any relatives or body parts) and leave the rest of the garden to slope naturally. Done well, the planting will eventually take your eyes away from the fact the borders are sloping.

This option will still need retaining walls, but less because you’re only putting them around the patio and or main lawn area.
Design differences with slopes that go up vs down from the house
Design-wise, regardless of the direction your garden slopes you still need to do what’s already been discussed by creating clearly defined shapes that suit the garden (which I cover in detail in our online garden design courses).
Slope UP
But with gardens that slope up from the house, you need to terrace it in a way that makes the most of the space and doesn’t make it feel like you’re imprisoned by retaining walls…
If you have a lot of soil to retain with walls there’s a couple of options. If you need to have a high wall, dig it back further away from the house and give yourself as much ground-level surface as you can.
If that isn’t an option then stagger the change in level with 2 retaining walls and create a transition planter so that you’re not looking at straight at a tall wall as shown in the photo below.

And if that’s not possible then try to line steps to the upper levels up with your key viewing points of the garden, e.g. in line with your patio or kitchen door.
Step widths make all the difference!
Also, it’s a good idea to make the steps as wide as you can – this will lead the eyes up to upper level rather than have them stop at the retaining wall and this make the lower level feel much more spacious.

Slope DOWN
If the garden slopes down away from the house and you terrace it be aware that if it’s a significant drop, visually you will lose a section of garden closest to the retaining wall. Again, good wide and if possible, shallow steps will help it look better as they will link the areas together nicely.
The gentler you can make the transition be it up or down a sloping site, the better it will look.
The ‘Side Slope Solution’
The compromise solution can also work really well if your garden slopes from left to right. Levelling out the lawn and patio areas as best you can and have the borders slope is a great money-saving alternative to full terracing.
If the side slope is steep then you will need to terrace it or do a curved design that follows the slope as shown in our first example.
To make the most of a side slope garden try to have a reasonable size flat area in front of your main viewing points. And then a smaller second or third area at a lower level/s to give you the most usable space as shown below.

The area marked in red, on the image below, shows the position of the retaining wall that would be needed to create two levels. The planting border at the back would slope towards the lower level and the plants would help to hide the remaining slope.

The garden featured in the video below has both a lengthways and side slope and further illustrates the importance of creating defined areas.
Sloping Garden Masterclass Clip
If you’d like to learn more, attend one of Rachel’s FREE online garden design classes…

Photo credit: 1st image: FD Richards 2nd image: Mike Coghlan